With over 2 billion active users, Facebook tracks every action, reads every post, and even follows what you do on 3rd party sites. With this volume of data and resources, it has become one of the top social media platforms for advertising worldwide.
This platform is a gateway to efficiently reaching your target customer and attracting them into your sales or marketing funnel. Your digital marketing campaign will be missing deals and leaving money on the table without the addition of Facebook ads.
In this article, the team from Clash Graphics offers the simple steps to setting up and running a successful Facebook ad campaign.
Step 1 - Installing Pixel
Running Facebook ads without having Pixel installed is like playing a game of darts while blindfolded. You may luck up once and hit the target, but you won't have references to better your aim for your next attempt/ad.
Considered as Facebook’s equivalent to Google Analytics, Pixel will track visits and conversions, while providing the information to build your audience, and to optimize your advertising campaign. Here how you install the pixel.
Retrieve and install Pixel Code - On your Facebook brand page, locate and click on "Ads Manager" then:
![]()
- Select "Pixels" in the drop-down menu, then "Setup Pixel."
- Select "Copy and Paste the Code" for regular websites.
- "Use Integration or Tag Manager" is for e-commerce sites.
- Copy the code and paste it into the "Header Script" of your website's theme.
If your site's theme doesn't have a "Header Script" option in the theme, use an "Insert Header and Footer" plugin.
- On your site’s dashboard, go to plugins and select “add new.”
- Then search for “Insert Header and Footer.”
- Install the plugin
- Open it and paste the Pixel code in the header.
To verify that you have successfully installed Pixel:
- Download and install the "Facebook Pixel Helper."
- The Helper icon will show on your browser's taskbar.
- Go to the site where you installed Pixel and click on the icon.
- A window will open verifying "Pixel found on www.yoursite"
- You can use this feature to see if Pixel is running on any website.
Watch this video to learn how to install the Facebook Pixel.
Step 2 - Facebook Ad Manager
Go to Facebook. In the drop-down menu on the Facebook taskbar, click on “Advertising on Facebook” or go to https://www.facebook.com/business/ then click on “Create An Ad.”
Step 3 - Choose Marketing Objective
On the objectives page, there are three categories of options to choose from:
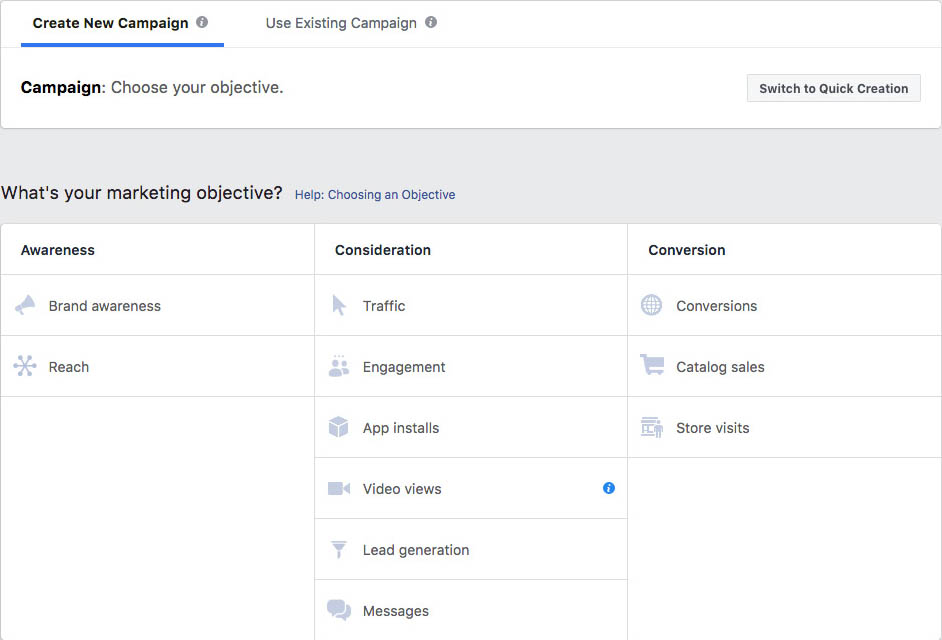
Awareness – Objectives meant to generate interest in the product or service.
Consideration – Objectives that prompt potential customers to begin thinking about the business and seeking more information.
Conversions – Objectives meant to encourage people to purchase the product or try the service.
- Select “Traffic” in the consideration column – This is the most common selection, and all you need at this point.
Step 4 - Name the Campaign
To keep your campaigns organized, name them using the client’s name and the goal of the campaign.
Examples:
- Soap Dish New Customers
- Ortho South New Patients
Note: Naming your campaign is one of the most important steps in this tutorial, as will become evident in the last steps. Eventually, the formula will be:
“Client Name + Goal + Target Demographics + Ad Description”
For new accounts, click the “Set Up Ad Account” button. You will be asked to set country, currency, and time zone.
Once done, click “Continue.”
Step 5 - Set Ad Targeting and Budget
The first field is “Ad Set Name.” leave it blank, for now, the information to create the name will be determined below. We’ll get back to it.
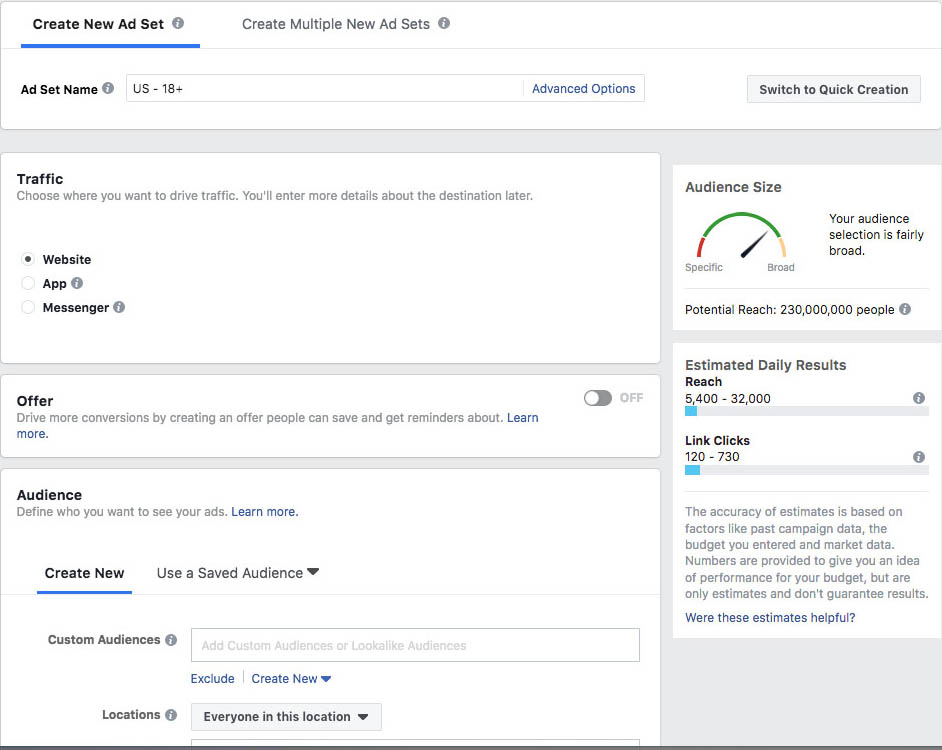
Traffic – should be preset to “Website.”
Offer – should be preset to “Off.”
Audience – You will create a new audience (in the future you can use this segmented audience group if you save it). Here’s how to create a new audience group:
- For location, choose the geographic area of your ideal customers that you would like targeted; add the address, postal code, state, or country.
When using a specific address (for a local business), set the reach around that address (up to 50 miles).
- Specify the age, gender, and language of the target audience.
- Under “Detailed Targeting,” you can narrow down the audience or exclude people that will see your ad.
Excluding certain people is helpful in situations such as: when your ad targets a specific group within an age group, income, job title, or education level.
Click the “Browse” button to select from Demographics, Interests, and Behaviors. You can make multiple selections.
- Expand Interests and Connection Type are optional settings which may affect the ad’s reach.
Example: You can have Facebook serve your ad to an audience interested in photography, gardening, traveling, etc. Furthermore, you can determine which type of device the ad will appear on.
Placements – You will find this already set to “Automatic Placements.” Select “Edit Placements” and deselect all of the platforms. Now you can choose the desired locations (Facebook Feeds is the most common).
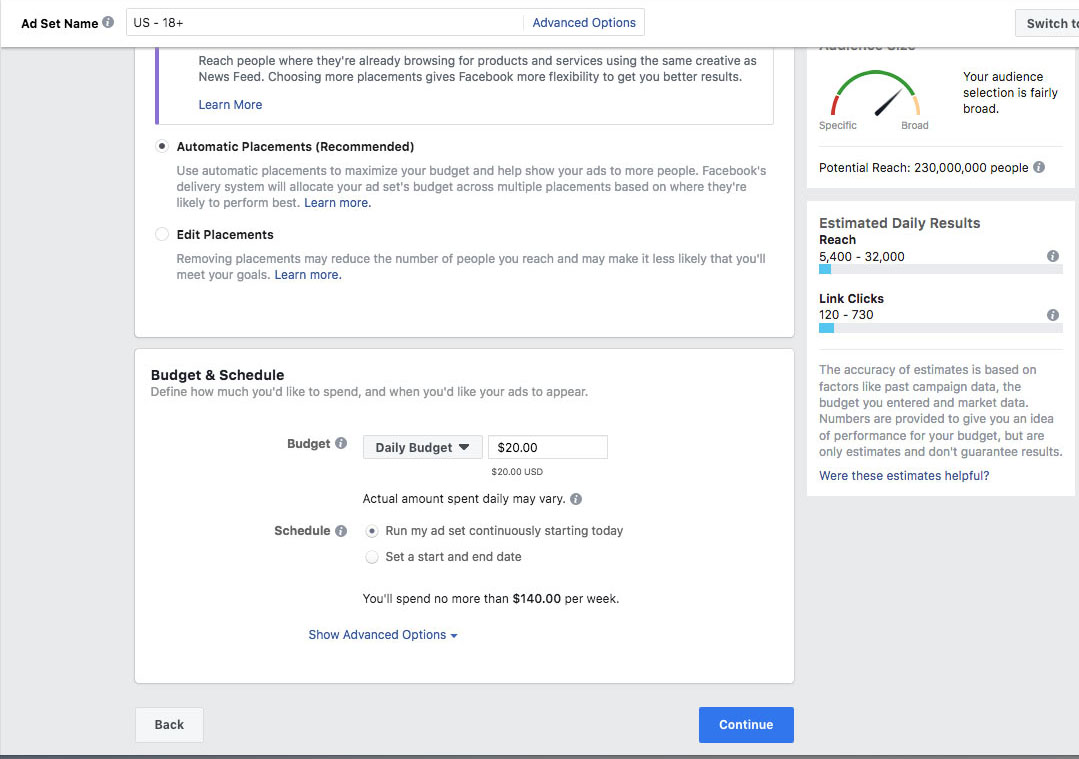
Budget – You can set a daily or a lifetime budget for your ad.
Schedule – You can run your ad continuously or set a start and end date.
Name the Ad Set – Now that you have the demographic information, you can name the ad set following the previously mentioned formula.
Examples:
- Soap Dish New Customers 18 35 single
- Ortho South New Patients 35 75 recently moved
Once you’ve named the ad set, click “Continue” at the bottom of the page.
Step 6 - Create the Advertisement
Again, the first field is “Ad Name.” leave it blank, for now, the information to create the name will be determined below. We’ll get back to it.
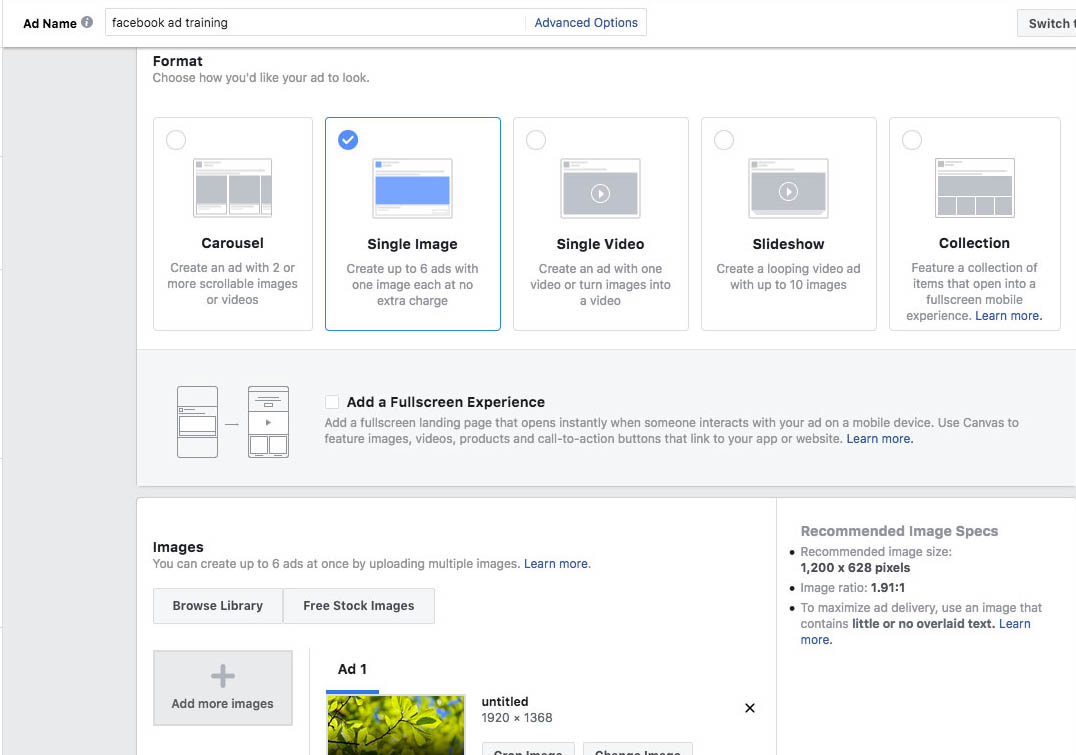
Identity – Here, you will connect the appropriate Facebook page to the ad.
Format – This is where you determine the appearance of the ad.
Images – Upload Image(s) for the ad. (Tip - it is always recommended to use real client images for better results)
Links – This is where you will build the ad.
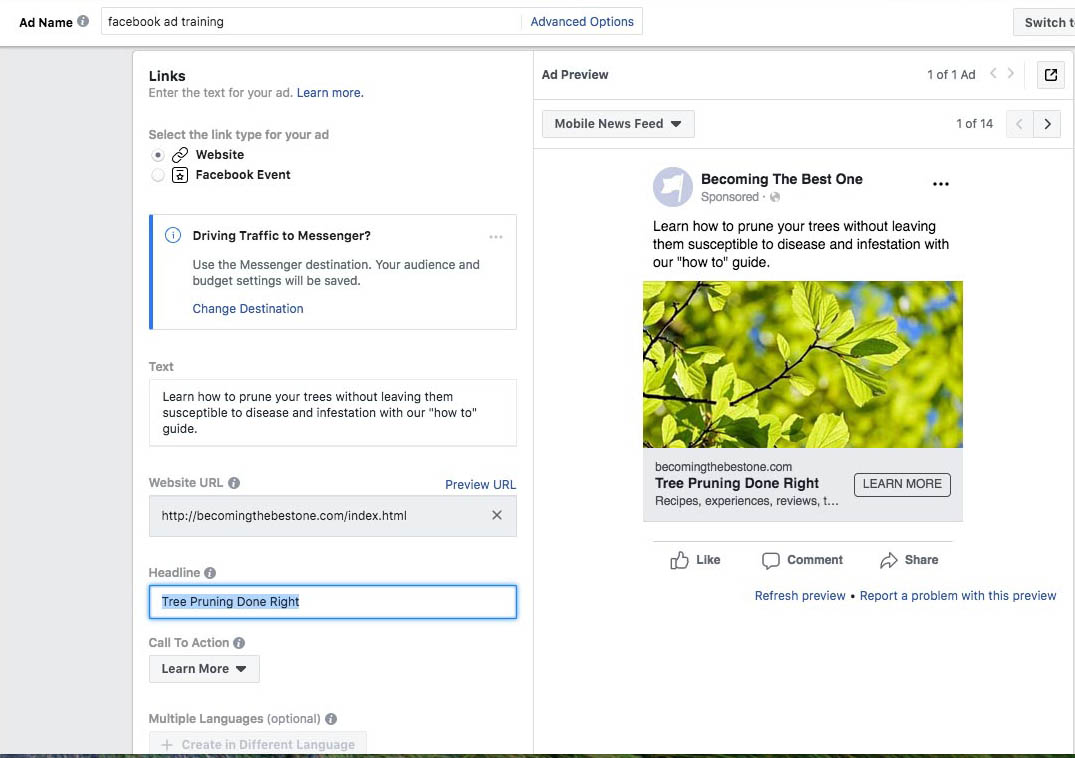
- Add website URL
- Add headline and ad text. The text is the most critical part of the ad, followed by the headline. Your audience will decide to engage (or not) by reading these.
- Choose a “Call To Action.”
- Click on “Advanced Settings.”
- Add display link (must match the website URL).
- Add news feed link description (more of a reason to visit the page).
- Turn on Facebook Pixel.
Name the Ad – Now that you have the ad information, you can name the ad following the previously mentioned formula.
Examples:
1. Soap Dish New Customers 18 35 single blonde woman smiling
Client Name + Goal + Target Demographics + Ad Description
2. Ortho South New Patients 35 75 recently moved older happy couple
These names may seem long, but they are important, intentional, and will allow you to identify your ads without having to open each one.
Step 7 - Publish the Advertisement
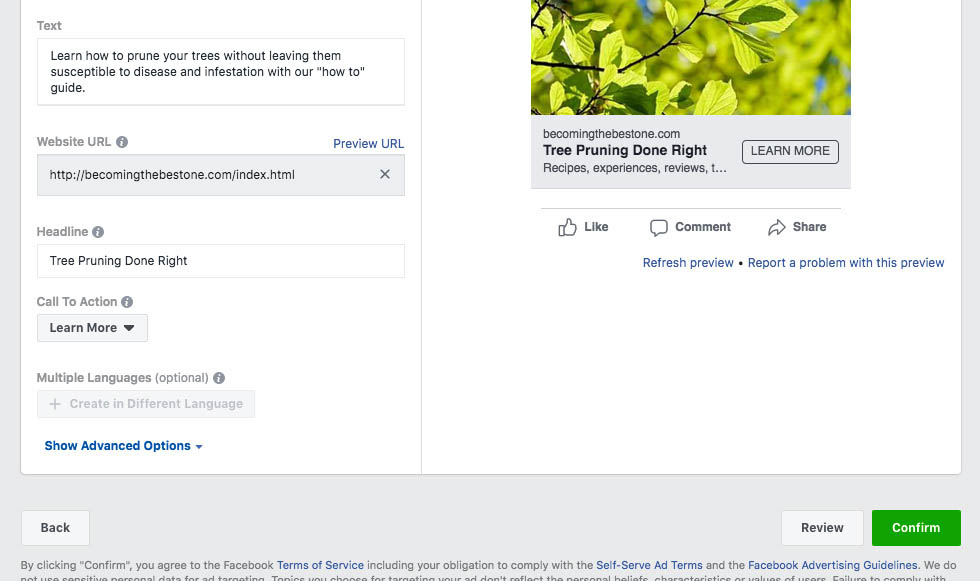
Click on “Confirm” or “Place Order” to launch the ad. If you wish to review your work, click on “Review” or “Review Order” to save the ad and make any necessary changes.
Once you confirm the ad, Facebook will either let it go live or refuse it. In the event of a refusal, Facebook will send an explanation of that refusal to you.
Make any necessary corrections and resubmit the ad.
Facebook Ad Guidelines
Keeping your Facebook ad account active and in good standing depends on your adhering to a series of strict guidelines.
If you should violate Facebook’s guidelines and find your ad account suspended, it will be complicated (next to impossible) to get that suspension lifted.
As well, all of your information, the credit card used, and all profiles associated with the suspended account will no longer work in the creation of Facebook ads.
The following are mostly common sense guidelines:
- Your landing page must link to your Terms of Service “TOS” and Privacy Policy.
- The ad must match the content of the landing page it links to (No Bait & Switch tactics or trickery).
- Do Not directly call out your target audience. (e.g.: men over 50, or women in Atlanta Georgia)
- With ads related to Facebook advertising, you must use a claim, which clearly states “No association with Facebook.”
- No sexual or sexually suggestive images or text.
- No tobacco or drug products
- No cursing or vulgarity
- Do not make bold claims “You’ll Make Millions” or “You’ll lose 20 lbs,” etc.
The Wrong Way to State a Claim - Phrases like “Let me show you how you can make…” or “With my fitness course, you’ll lose 30 lbs” are not acceptable.
The Acceptable Way to State a Claim - The way to present these ideas is “Let me show you how I made…” or “With my fitness course, I was able to lose…”
Facebook frequently updates its ad guidelines. It is imperative to not only read them but to stay up to date with them.
Creating and Running Successful Facebook Ads
Adapting your marketing strategy to exist on a platform that has over 2 billion active users seems quite obvious, and using the steps above, you can create and run a Facebook ad campaign.
From these steps, you’ve learned how to install and use the Facebook Pixel, navigate Facebook’s ad manager, choose objectives, strategically name your campaign, ad set, and ad. Then we covered how to set targets, a budget, and finally create and publish ads that follow Facebook’s ad guidelines.
Businesses unwilling to invest in creating and running Facebook ads are potentially limiting their companies grow and leaving vast sums of revenue on the table for their competitors to steal.
Clash Graphics Print Shop Atlanta Flyer Printing
2233 Peachtree Rd NE Ste 202 Atlanta, GA 30309
(678) 235-3464
To view the original version on Clash Graphics, visit: http://www.clashgraphics.com/printing-tips/7-steps-running-facebook-ads/